
Introduction
Please read before proceeding to avoid damaging the controller and voiding your warranty
- Avoid connecting the Controller via USB when you do not need to. (Except when instructed to in the guides)
- Always unplug the WorkBee Power Supply before connecting the USB Cable.
-
-
Open the Control Panel on your windows computer.
-
Click 'Network and Internet'.
-
Open the 'Network and Sharing Center' and click 'Change Adaptor Settings'.
-
Right Click on the Ethernet Port and click 'Properties'.
-
For Mac users goto System Preferences > Network. Select 'Ethernet' from the left pane.
-
-
-
This Step only applies to Windows Users.
-
Under the Ethernet Port properties click 'Configure'
-
Click the 'Power Management' tab.
-
If you do not have a 'Power Management' tab, ignore the rest of the points in this Step and proceed to Step 3.
-
Untick 'Allow the computer to turn off this device to save power'
-
Click 'Ok' to save this setting.
-
-
-
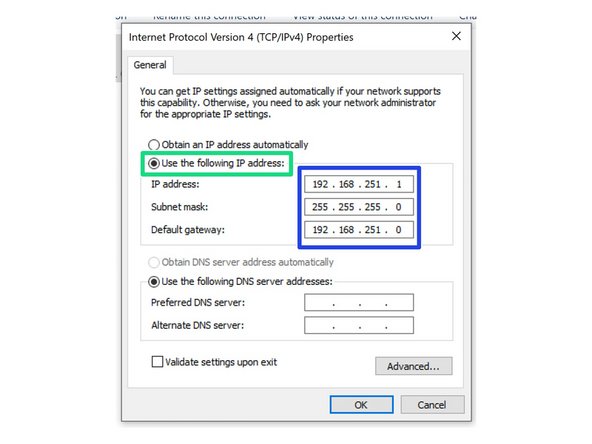
Click on 'Internet Protocol Version 4' so it is highlighted. Then press the 'Properties' button.
-
Select 'Use the following IP address'
-
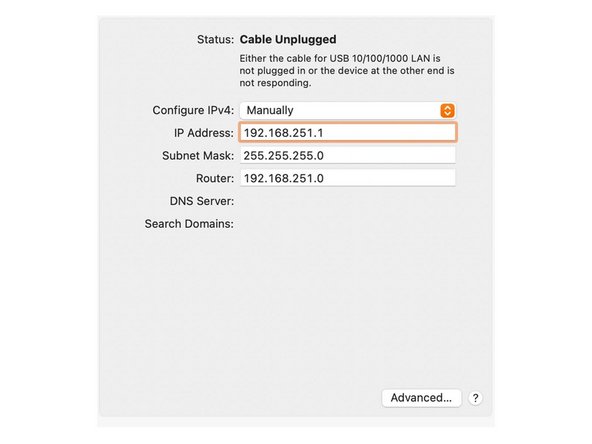
For Mac users change the 'Configure IPv4' dropdown to 'Manually'
-
Enter the following IP Addresses
-
IP Address: 192.168.251.1
-
Subnet mask: 255.255.255.0
-
Default gateway: 192.168.251.0 (On a Mac this is called Router)
-
For Mac users see Image 3 for correct settings.
-
-
-
Plug the Ethernet Cable into your computer.
-
Plug the Mains Cable into the Power Supply and then into the wall socket.
-
Unlatch the Emergency Stop and turn on the wall socket.
-
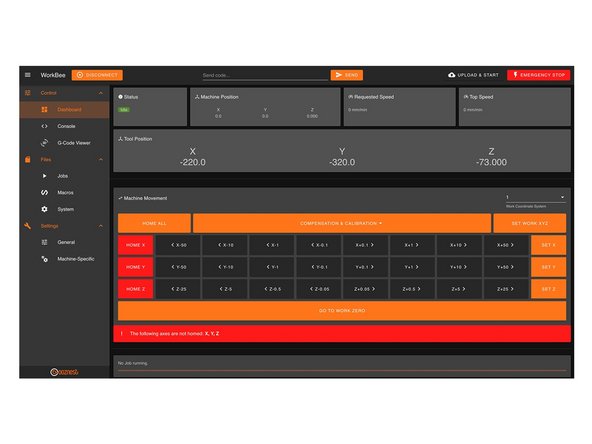
Open your browser and enter the url: http://192.168.251.2/
-
You should now see the WorkBee Control Interface!
-
Bookmark the url and add it to your favourites for easier access in the future.
-
-
-
Welcome to WorkBee Control!
-
Guide Complete - Proceed to 1. Final Assembly
-


Thanks for following the guide. Any issues, please contact us!
Thanks for following the guide. Any issues, please contact us!
Cancel: I did not complete this guide.
25 other people completed this guide.

3 Comments
Please follow these steps:
- Turn off mains power to your WorkBee and plug it in via Ethernet to your home router or networked switch
- Connect via USB following this guide: 1. Connecting your Controller via USB - Windows (Ignore the first point where it says do not follow this guide if you have the Ethernet version of the Controller)
- Send the command: M552 S0 and wait 10 seconds
- Send the command: M552 S1 P0.0.0.0 and wait 30 seconds
- Send the command: M552
- It should come back with an IP Address the WorkBee is now connected under. Go to this IP Address in your web browser and bookmark it.
- In WorkBee Control go to Files > System and open config-network.g
- Find this line: M552 S1 P192.168.251.2 and change it to M552 S1 P<IP ADDRESS>
Change <IP ADDRESS> to the IP Address you are currently connected under.
- Save the file, do not restart.
- Unplug via USB and turn on mains power. It should reconnect under the new IP Address
Hello,
I want to connect my controller ethernet cable to the Wi-Fi extender(access point) and then operate my workbee via a laptop connected to my wifi. How should I proceed with this?
It is possible to connect the WorkBee to your home network using DHCP. Please follow these steps:
- Turn off mains power to your WorkBee and plug it in via Ethernet to your home router or networked switch
- Connect via USB following this guide: 1. Connecting your Controller via USB - Windows (Ignore the first point where it says do not follow this guide if you have the Ethernet version of the Controller)
- Send the command: M552 S0 and wait 10 seconds
- Send the command: M552 S1 P0.0.0.0 and wait 30 seconds
- Send the command: M552
- It should come back with an IP Address the WorkBee is now connected under. Go to this IP Address in your web browser and bookmark it.
- In WorkBee Control go to Files > System and open config-network.g
- Find this line: M552 S1 P192.168.251.2 and change it to M552 S1 P<IP ADDRESS>
Change <IP ADDRESS> to the IP Address you are currently connected under.
- Save the file, do not restart.
- Unplug via USB and turn on mains power. It should reconnect under t
Robert -