
Introduction
This guide goes over connecting to your WorkBee CNC Machine, updating the WorkBee firmware to the latest release.
-
-
Download the latest firmware from: WorkBee Firmware Releases
-
Unzip the folder to somewhere on your computer.
-
Do not unzip any folders inside this one.
-
-
-
The WiFi & Ethernet Duets require a different setup format depending on how you are connecting to it, please follow the appropriate Step for your Workbee.
-
For Wifi Connected to an External Network.
-
Click Upload under the Settings - General Tab in the Duet Web Control.
-
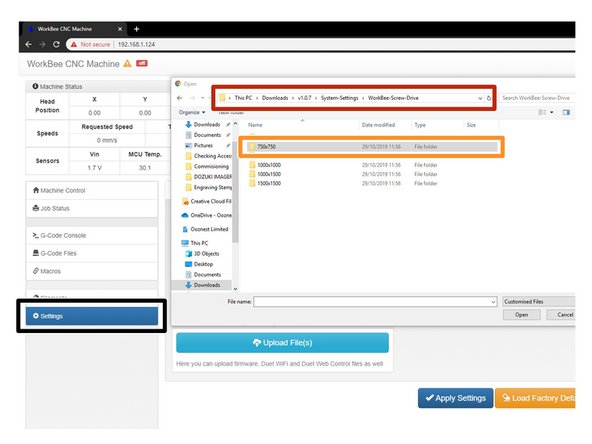
Open the latest version of the Firmware, navigate to System Settings.
-
Choose the Machine Drive and Size folder.
-
Select all files inside that folder and click open to upload them to the Duet.
-
The controller should automatically reboot after the upload is complete. If not please press the emergency stop button to force restart the controller.
-
-
-
The WiFi & Ethernet Duets require a different setup format depending on how you are connecting to it, please follow the appropriate Step for your Workbee.
-
For Wifi Connected as an Access Point.
-
Click Upload under the Settings - General Tab in the Duet Web Control.
-
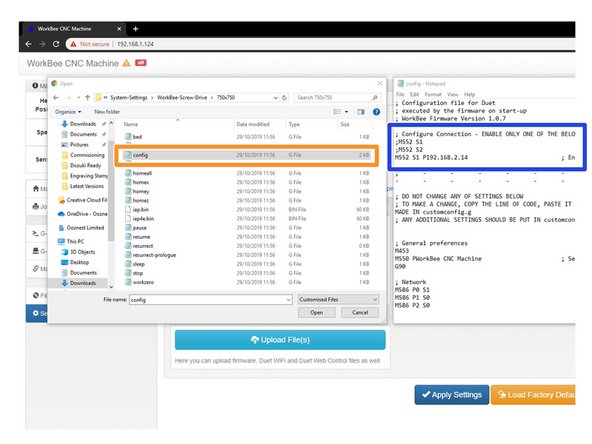
Open the latest version of the Firmware, navigate to System Settings.
-
Choose the Machine Drive and Size folder. Once the folder is open right click on config.g and click edit.
-
In Notepad add a semicolon in front of M552 S1 and remove the semicolon from the front of M552 S2, save and close this file.
-
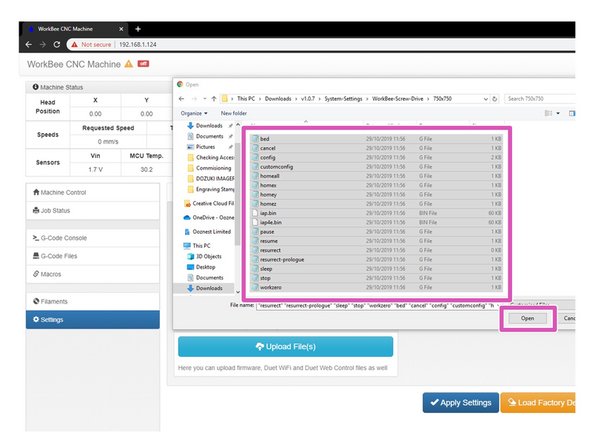
Select all files inside that folder and click open to upload them to the Duet.
-
The controller should automatically reboot after the upload is complete. If not please press the emergency stop button to force restart the controller.
Hello again Ryan,
I have managed to make thing work with the “WorkBee-Firmware-v1.0.3.2” version. I have a Duet 2 Wifi/Ethernet v. 2.03, is it possible to update to v1.0.7? Do you have to update to the latest version in order to use the latest UI?
Afshin Ghafoori - Resolved on Release Reply
Getting the error message:
× M98 P"0:/macros/Work Coordinate System/B3 - Return To Work Zero"Error: G0/G1: target position outside machine limits
Afshin Ghafoori - Resolved on Release Reply
Trying to figure this out, should i update the macros file? Where could i find the latest macro files?
Thanks/Afshin
Afshin Ghafoori - Resolved on Release Reply
Hello Ryan,
Having some trouble when trying to update. Have a mill in the maximum dimensions of 800x770 mm. Which system setting dimension should i choose, 750x750 or 1000x1000, is there any differences?
I manage to follow your steps and correct the config file as shown in the description but i cant manage to find the machine after the upload. Also tried to change the ip but that does not seem to work. When uploading without any changes in the config file, i manage to connect and move the axis as well as home function. But the work zero wont work…..
My machine is connected through the wifi….do i need to do step 4?
Any suggestions would help
/Afshin
Afshin Ghafoori - Resolved on Release Reply
-
-
-
The WiFi & Ethernet Duets require a different setup format depending on how you are connecting to it, please follow the appropriate Step for your Workbee.
-
For Ethernet Connected directly to a computer.
-
Click Upload under the Settings - General Tab in the Duet Web Control.
-
Open the latest version of the Firmware, navigate to System Settings.
-
Choose the Machine Drive and Size folder. Once the folder is open right click on config.g and click edit.
-
In Notepad add a semicolon in front of M552 S1 and remove the semicolon from the front of M552 S1 P192.168.2.14, change IP Address to suit based on the previous completed guide 2. Connecting your Duet to a Network - Ethernet Save and close this file.
-
Select all files inside that folder and click open to upload them to the Duet.
-
The controller should automatically reboot after the upload is complete. If not please press the emergency stop button to force restart the controller.
-
-
-
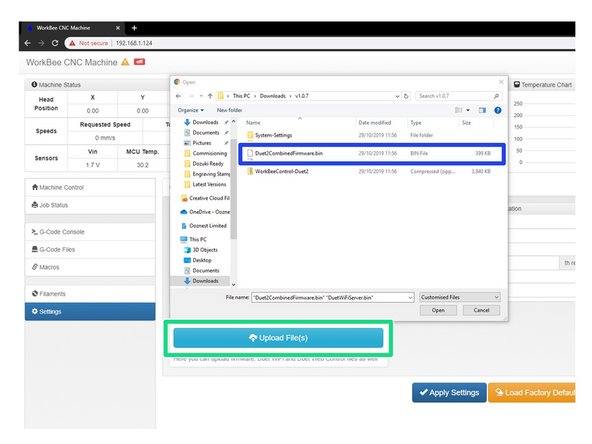
In WorkBee Web Control go to Settings > General
-
Press Upload File
-
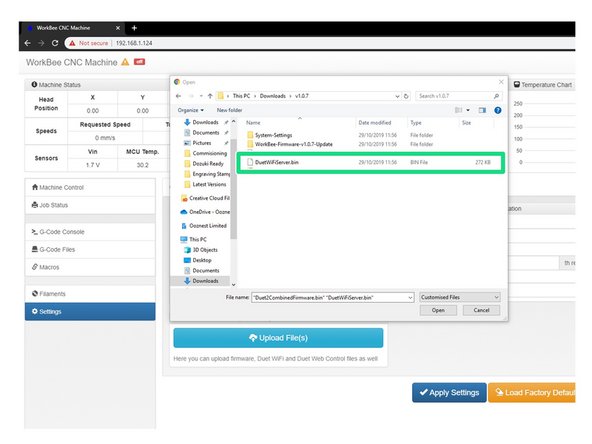
Navigate to the unzipped firmware folder and select "Duet2CombinedFirmware.bin"
-
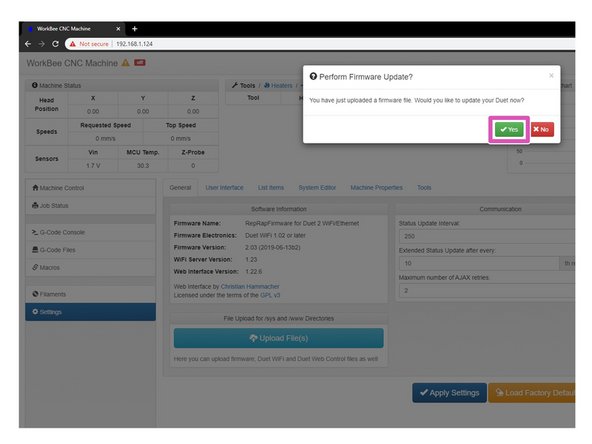
Wait for the file to upload, and press "Yes" on the update prompt.
-
Wait for the update to complete.
-
The controller should automatically reboot after the update is complete. If not please press the emergency stop button to force restart the controller.
-
-
-
Repeat Step 5 but this time for DuetWifiServer.bin (If applicable)
-
Do not do this step if you have the ethernet version.
-
The controller should reboot automatically after the update is complete. If not please press the emergency stop button to force restart the controller.
-
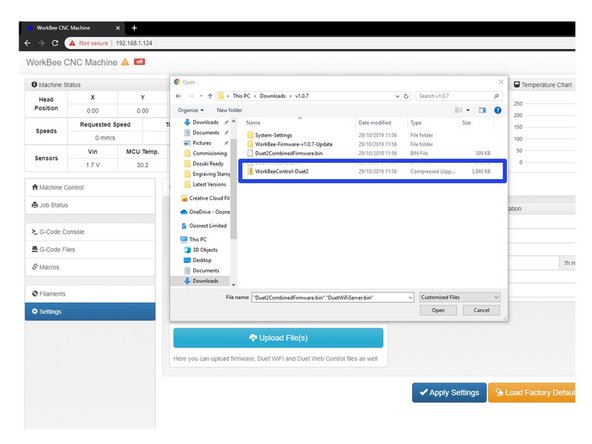
Repeat the above, but this time for WorkBeeControl-Duet2.zip this will now update your WorkBee CNC Machine to have the latest WorkBee Control Interface.
-
-
-
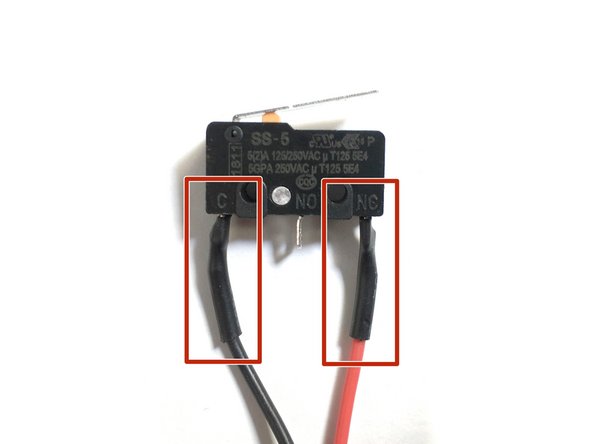
Please check if your limit switches are wired the same as in the image. One wire going to the 'C' terminal and one wire going to the 'NC' terminal. If they are continue with this step. If they are not the same, then this step can be skipped.
-
If your limit switches do not match the image do not be concerned as everything will still operate correctly.
-
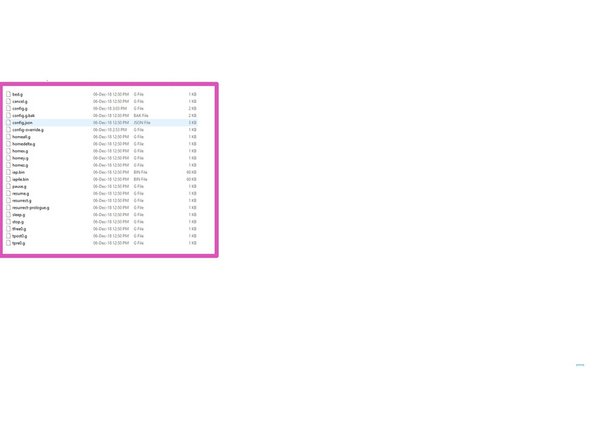
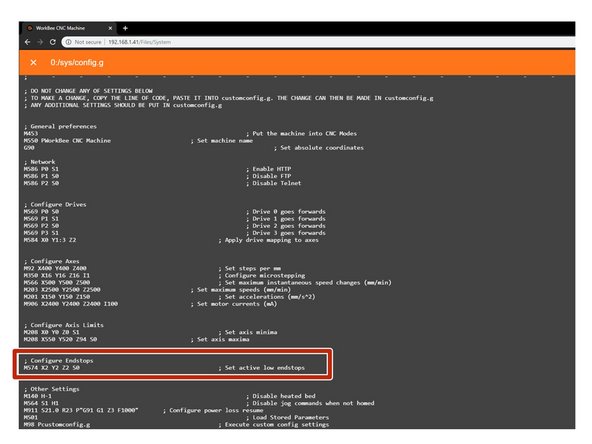
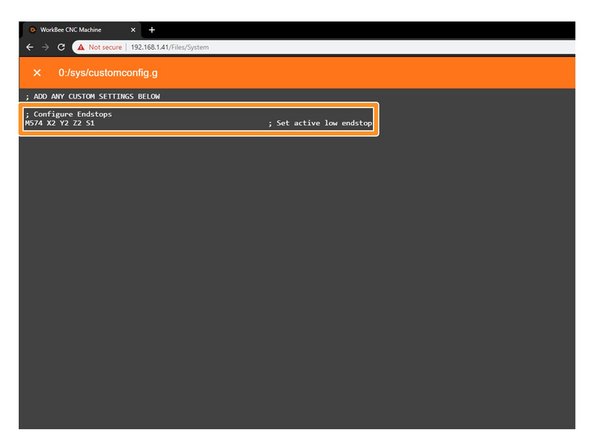
Under File Management open System - Config.g and Copy the Configure Endstops information.
-
Return back to System and open Customconfig.g and paste in the Lines as follows ; Configure Endstops M574 X2 Y2 Z2 S1 ; Set active low endstops changing the S0 to S1 to reflect the NC Terminals.
-
If you have different configurations for each switch please email sales@ooznest.co.uk for further advice.
-
Once complete, Press 'Save' and reboot by pressing the Emergency Stop Button.
-


Thanks for following the guide. Please move onto the next guide to learn how to use your WorkBee CNC Machine. Any issues, please contact us!
Thanks for following the guide. Please move onto the next guide to learn how to use your WorkBee CNC Machine. Any issues, please contact us!
Cancel: I did not complete this guide.
28 other people completed this guide.

4 Comments
I am not sure which update steps to follow. My CNC is connected to my network via an Ethernet cable that runs to my network router however my laptop is connected to the same network router via wifi so would I use the update for Ethernet connected directly to computer since the CNC is hardwired?
thewoodknotsworkshop@gmail.com - Resolved on Release Reply
You probably solved it already, but in case anyone else wonders as well: You should use the instructions that matches your WorkBee (and not laptop). So in your case it would be “Uploading System Settings for Ethernet".
Björn -
….and I’m not sure if this is what the customisation file is for? Does this override the standard settings in the config files?
Peter Bezer - Resolved on Release Reply
Adding the machine sizes is good, but if like me, my end stop settings vary from the standard and I get a few mm extra travel, I need to change the maxima’s. Adding which parts may require changing would help?
Also, if the calibration has been done, this needs to be changed in M92 part?
I’ve not done the update yet, so apologies if I got it wrong. ;o)
Peter Bezer - Resolved on Release Reply