
-
-
WorkBee Control has only been tested on Google Chrome
-
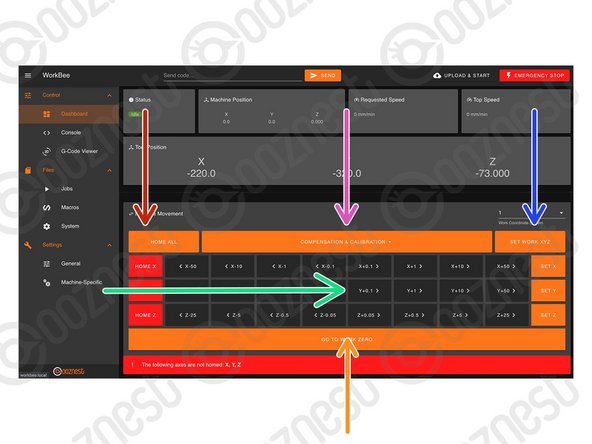
The Name of the machine.
-
Advanced Users: The machine name can be changed by adding the command M550 "Machine Name" to config-user-settings.g
-
Send Manual G-Code commands.
-
To upload and start a job.
-
Make sure the machine has been Homed and Work Zero set.
-
Triggers a software emergency stop.
-
-
-
Current position in Work Coordinates.
-
The Work Coordinates displayed are determined by the Work Coordinate Selection dropdown.
-
Advanced Users: To find out the machine positions of all Work Coordinates open File Management > System > config-override.g
-
Advanced Users: You can directly edit the machine positions of the Work Coordinates in config-override.g and save it.
-
Current position in Machine Coordinates
-
The machine ALWAYS moves within a Work Coordinate system. Machine coordinates are not a selectable coordinate system.
-
Advanced Users: To make absolute G-Code command movements in machine coordinates, G53 has to be explicitly stated at the beginning of each line.
-
-
-
Used to home the machine. You need to home the machine when it is turned on.
-
When homing an individual axis, it will always home the Z first to insure it is clear of any work piece.
-
Used to jog the machine around the work area. Right-click to modify distance.
-
The jogging feedrate can be modified under Settings > Machine Specific > 'Feedrate for move buttons (mm/min)'
-
Used to set the Work Zero position for the selected Work Coordinate System.
-
Move the machine to the Work Zero position of the currently selected Work Coordinate System.
-
The Compensation and Calibration buttons allows a probe to measure the overall work area flatness. Height maps are useful for milling PCB's. More information on using these buttons can be found here: https://docs.duet3d.com/meshbed
-
-
-
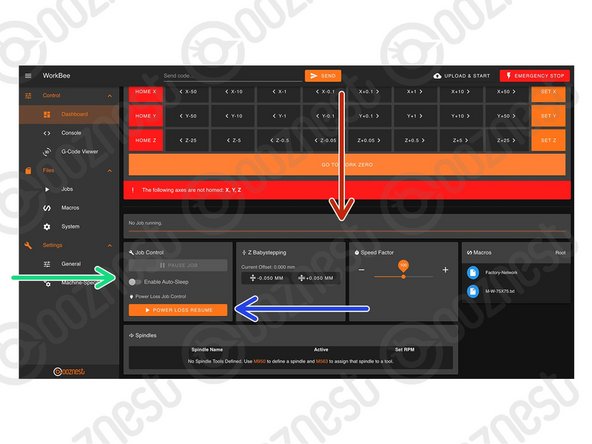
When running a job, the progress of the job will be displayed here along with the percentage complete and estimated time remaining.
-
When running a job, pause, resume, & cancel buttons will show here. When pausing a job it will save the current position and home the machine.
-
A controlled power off can also be performed in the middle of a job. This will pause, home and save the current job position, allowing it to be continued at a later time.
-
Use this button to resume a job after a controlled power off.
-
This button can also be used to resume a job after an unexpected power loss.
-
Advanced Users: 'Enable End G-Code' allows a set of pre-defined commands to be run after a job is completed.
-
These commands are defined under File Management > System > Sleep.g
Hi R S,
You can modify the behavior of the 'Pause' and 'Cancel' functions in WorkBee Control to prevent the machine from homing after these actions. To do this, navigate to File Management > System within WorkBee Control and edit the pause.g and cancel.g files. This approach allows you to tailor the machine's response to better suit your workflow.
I hope this helps!
-
-
-
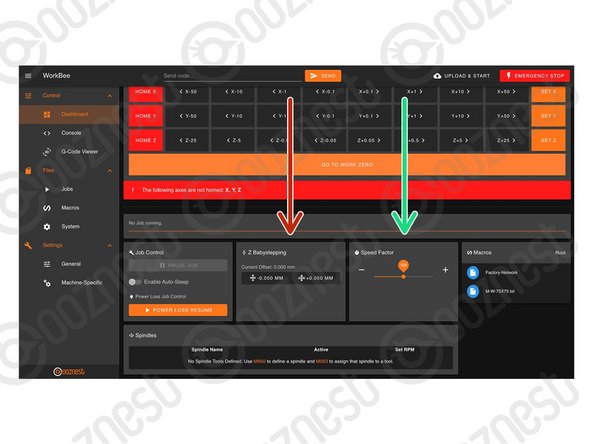
When running a job these buttons allow micro-adjustment of the Z-Axis
-
For example if the job is not cutting deep enough, these buttons can be used to shift the job downwards.
-
Be warned it will move the whole job downwards by same amount, including Z-Axis Safe Heights.
-
A slider to speed up or slow down the job. The speed is represented by a percentage, with 100% being the normal speed.
-
-
-
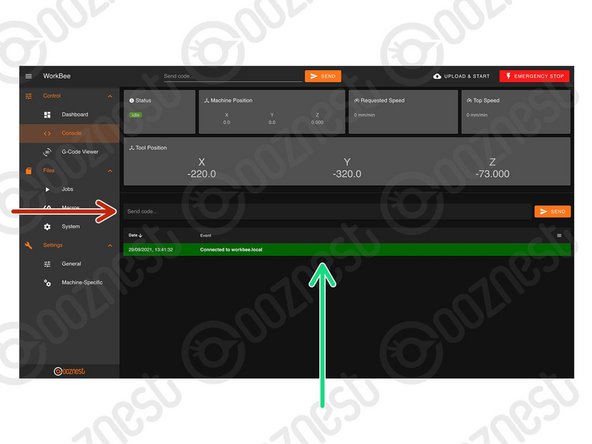
Send Manual G-Code commands.
-
Important information outputted from the WorkBee will be displayed here.
-
-
-
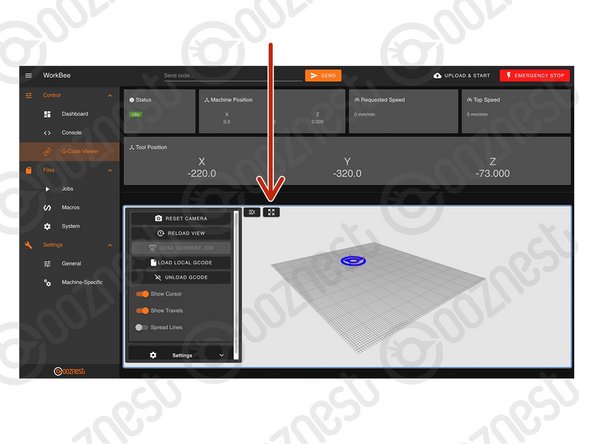
Makes the G-Code Viewer Fullscreen.
-
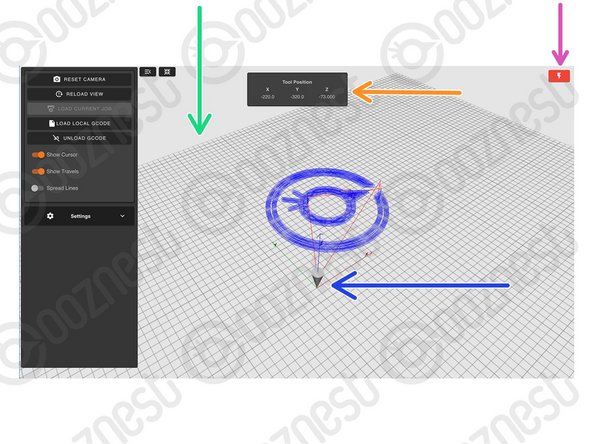
Use the mouse scroll wheel to zoom in and out.
-
Mouse Left-click to Orbit.
-
Ctrl + Mouse Left-click to Pan.
-
The grid shows the machines working area.
-
The X, Y, and Z-Axis markers show where the selected Work Zero is located in the machines working area.
-
Current position in Work Coordinates.
-
Software emergency stop.
-
-
-
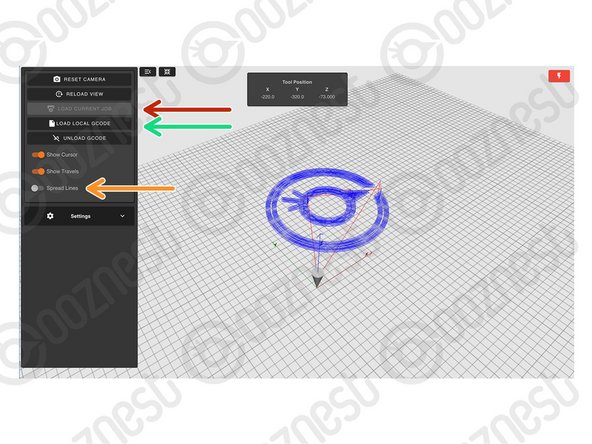
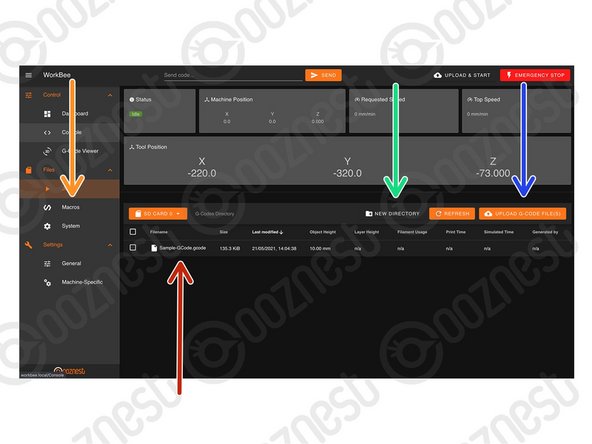
Loads the current Job.
-
In this mode it will only display progress thus far.
-
Loads a local file from your computer.
-
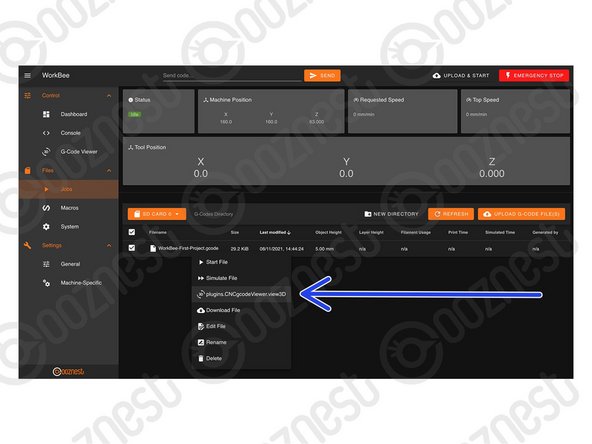
If a job is running, you can load it locally by right clicking the file under File Management > Jobs and press 'plugins.CNCgcodeViewer.view3D'
-
This will display the whole job.
-
It will show the progress in green if you load it once the job is already running.
-
This will elongate the spaces between passes. It can make files much easier to view.
I have a problem, I see the cursor but not the travels in blue and the spreads in red.
The work simulation works.
If I run the job, the viewer only shows the current job cursor.
LIONEL DURAND - Resolved on Release Reply
Hi Lionel,
I think if you start the job, and then load the job into the G-Code viewer like Step 10 here: First Project
This should solve your issue.
Thanks.
-
-
-
This is where all the Jobs are stored.
-
Clicking on a Job will run the Job.
-
Right clicking on a Job will also allow the file to be run, and in addition: Simulate, Download, Edit, Rename, and Delete.
-
Create a sub-folder
-
Upload a job to the current folder
-
The Macros page is similar the Jobs page.
-
Macros are different to jobs in that they are a sequence of commands which are regularly run.
-
For example a macro could be created that would move the head to the machine center instead of typing manual commands each time.
-
-
-
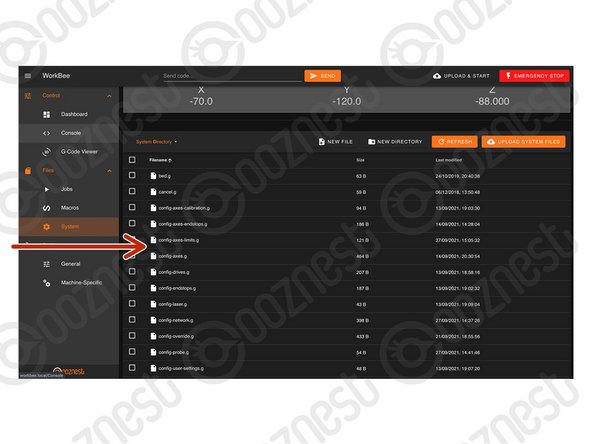
This contains all the System files.
-
Anything with 'config' in the name is run at startup.
-
We advise putting any custom settings in 'config-user-settings.g'
-
homeall.g, homex.g, homey.g, and homez.g contain the commands that are executed when the homing buttons are pressed.
-
workzero.g contains the commands that are executed when 'Go To Work Zero' is pressed.
-
-
-
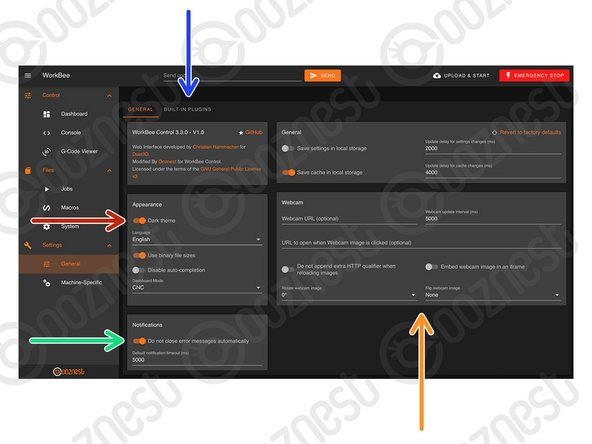
Change Theme Colour
-
Autoclose Notifications
-
Manage plugins packaged within WorkBee Control.
-
Configure Webcam. See Duet's Guide.
-
-
-
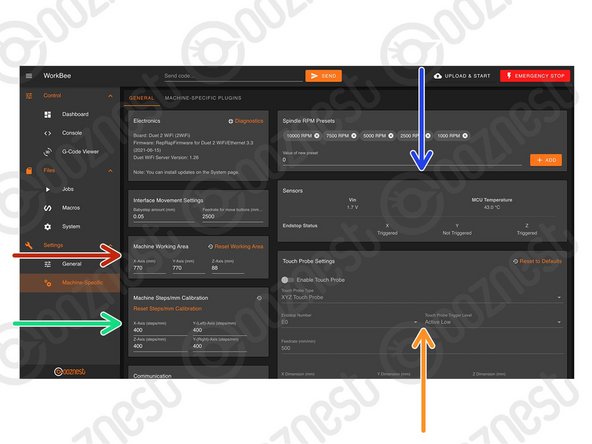
Change machine working area (No restart required)
-
Change machine Steps/mm (No restart required)
-
Sensor statuses
-
Touch probe settings. See Assembling Your Original WorkBee XYZ Touch Probe
-


Thanks for following the guide. As mentioned this was just a brief outline of using WorkBee Control. Please visit our YouTube channel for more in-depth tutorials on operating a CNC Machine. Even though some of the videos on our YouTube channel use an older version of the WorkBee the concepts still apply!
Thanks for following the guide. As mentioned this was just a brief outline of using WorkBee Control. Please visit our YouTube channel for more in-depth tutorials on operating a CNC Machine. Even though some of the videos on our YouTube channel use an older version of the WorkBee the concepts still apply!
Cancel: I did not complete this guide.
53 other people completed this guide.

77 Comments
I created a subroutine in my gcode for a repetitive task (drilling a hole) and used the command G98 to call it and G99 to end the subroutine. This subroutine is embedded in the main code. When I run the code on my Workbee it keeps error messaging 'Makro cannot be found'. I spend many hours on trying to solve it.... : without luck. What could be wrong ?
Mark Wiersma - Open Reply
Hello everyone,
I have been trying to configure my 1500 x1500 machine correctly for a few weeks. My problem is that when I do Home general, the position of the tool is at (0,0,0) in the lower left corner, but the position of the machine appears as within the limits (1285,1275,90). Also, to move I have to use negative values like X- to go to the right and Y- to go forward and Z- to go down. Do you know how I can modify it?
I'm pretty new to this and I can't seem to get it set up properly. I appreciate your help. Thanks, Miguel
Hi Miguel,
I'm sorry to hear about the trouble you're having with your machine. It appears that your machine's coordinate system is inverted, causing the tool to move in the opposite direction of the commands.
Please reach out to our technical support team so we can assist you better. You can send an email at help@ooznest.co.uk or through https://ooznest.co.uk/help/.
We look forward to resolving this for you!
Cyndy -
Hello, would there be a way to automate the CNC based on sensor feedback? Using python maybe?
You can communicate with the board two ways outside of the Web Control HTTP requests or using Telnet.The source code for WorkBee Control can be found here: https://github.com/Ooznest/WorkBee-Contr...
To see how the HTTP requests are completed, start by looking at the PollConnector.js file.
There is a forum post about connecting via Python using Telnet here: https://forum.duet3d.com/topic/27396/bas...
Robert -
Problem, I calibrated IE cut 60mm square, this is spot on, but when you cut a 300mm(X axis) and 30mm(Y axis) the Y axis is bang on and the X axis is 5mm longer. every time even when running other programs(Gcode) I have checked the screws and all are tight. any help would be much appreciated. cheers peter
Can I send G-code directly to the workbee from python or similar or does the data have to come from this web app?
Looking to use the workbee (without a router head) as part of an automated measurement jig
Hi,
Yes, we have seen users do this before.
You can communicate with the board two ways outside of the Web Control, HTTP requests or using Telnet.
The source code for WorkBee Control can be found here: https://github.com/Ooznest/WorkBee-Contr...
To see how the HTTP requests are completed, start by looking at the PollConnector.js file.
There is a forum post about connecting via Python using Telnet here: https://forum.duet3d.com/topic/27396/bas...
Robert -
Hi,
I've just built my new Z1+ and produced my first test piece today, Workbee control is fine but I feel that the jog button should represent the direction the machine moves (arrows left/right, front/back for X/Y and up/down for Z) could this not be implemented in the next update, it makes things so much easier to visualise.
Lea Newton - Resolved on Release Reply
Hello :)
Can we change the home position?
Currently home is top right. Can this be changed to top left?
Thank you.
Jason King - Resolved on Release Reply
Hi Jason,
It would be easiest to keep the home position as is, but edit the homing scripts, so after it homes, it goes to the top left. Command: G90 G0 X0
Add this to the end of homeall.g and homex.g
Robert -
Hi,
I use a touchscreen device to control my workbee and accidental clicks have exposed some issues with Workbee Control which you may have overlooked.
It is possible to click the button to turn off the spindle/tool when a job is active, potentially crashing and breaking an endmill.
Movement, homing and set axis zero buttons on the dashboard should be disabled/greyed out when a job is running. I accidentally set a new X Zero in the middle of a job and ruined the part.
I hope you can fix these in the next update to WorkBee Control.
Andy Ofori - Resolved on Release Reply
Hi Andy,
Thanks for your comments and good feedback, we will look to get them changes implemented.
Robert -
Hi Ryan,
Is there a way to change the units from millimeters to inches in WorkBee Control? Created jobs in VCarve Pro in inches. If I enter inch dimensions and select “mm” it does not convert it. If I do the job in inches and upload that to the WorkBee, I don’t think the Workbee will convert it, right? What would be easiest, for me at least, would be to setup the WorkBee Control in inches.
Tom Hawkins - Resolved on Release Reply
Hi Tom,
Thanks for your post. If you send the command G20 in the WorkBee Control, it will now put you in inches.
You could add this command to config.g for it to be permanent.
Robert
Robert -
I must admit that the building of my 1500 x 1500 was as much pleasure as it is to start using it. Thanks
John Smith - Resolved on Release Reply
Sorry, tried to paste a screen shot but it wouldn’t accept.
****
0:/sys/pause.g
1; pause.g
2; called when a print from SD card is paused
3
4 M98 P”homeall.g” ; Home the machine
****
(note: The first quote marks on 4 should be the other way round)
Hi Steve,
Change it to this: ; pause.g
; called when a print from SD card is paused
G90
G53 G1 Z{move.axes[2].max} F1500 ; move the Z-Axis to the maximum position
G53 G1 X{move.axes[0].max} F2500 ; move the X-Axis to the maximum position
G53 G1 Y{move.axes[1].max} F2500 ; move the Y-Axis to the maximum position
And see if that helps.
Robert
Robert -
Hi all,
The answer is probably hiding in plain sight, but the issue I have is when I have ‘paused’ a job, it first completes the bit of G code its currently doing and then returns to the home position, which is all well and good.
However it doesn’t raise the z height before moving to the home position, resulting in the bit carving through the workpiece on its way home.
Should the z axis automatically raise itself to the safe height before it moves to home when the pause button is pressed? if not what should I be doing to make sure the bit is raised to a safe height when pausing the job?
Thanks in anticipation.
Steve
Hi Steve,
Thanks for the info. When you are not cutting a job and then press Home All, does the Z-Axis raise then?
Robert -
Hi Robert, I have the Z1+, so as I understand it, there is no firmware update.
Whilst I’ve got you, I also tried to increase the speed factor last night, but that didn’t work either, (again not sure if it’s ever worked because it was the first time of trying it)
I’m just going down into the garage to try both again. Just in case I was doing something stupid last night.
FYI I’m using Carveco maker
Steve -
Hi Steve,
Thanks for your comment.
Yes, when pausing it should finish the current G-Code line it is on. And then raise the Z-Axis.
If it is not raising the Z-Axis, that is an issue.
Are you on our latest firmware?
Robert -
Hello Ryan. Can you tell me if there is any way to switch the Z1 off on the control software, without just pulling the plug. Thanks, maybe it’s there and I can’t see further than the end of my nose.
Merv Howard - Resolved on Release Reply
Hi Merv,
Sorry there isn’t, you don’t need to pull the plug from the wall, just turn it off.
Robert -
Hello
Is it possible to control a workbee cnc with a duet2 controller with any software ? I want yo control my workbee cnc with openbuild control ?
Thanks a lot
Gregory Renault - Resolved on Release Reply
Hi Ryan , can you tell me if you can do a preview on the gcode Viewer ? kenny
kennyfaulkner@hotmail.com - Resolved on Release Reply
hi, I want to see the machine position in real time as its moving, it seems to display the moves ahead, is this a stetting i can change,
i have the Z1 with duet
appreciate any comments
regards
David, dhough552@gmail.com
david hoough - Resolved on Release Reply
Hi David,
Thanks for your email
Sorry, there is no setting to change it to what you want. The coordinates are based on where the current move would make it end up.
Thanks
Robert -
Hi Ryan,
Step 7 - G Code viewer
I do not have this as a selection under the ‘Control ‘ section. Below Dashboard and console I have ‘Height map’
Please can you let me know how I can access the G-Code viewer?
I have not been able to use my machine for a number of months due to illness so any help you can give would be appreciated.
Many thanks Serge Agius
serge agius - Resolved on Release Reply
Hi Serge. That is part of our latest WorkBee Firmware. You can upgrade by following this guide: How To Update WorkBee Firmware V1.0.7 > V3.3.0-1.2
Robert -
The reset motors calibration confirmation popup rather asks you to reset the probe. Confirming does reset the calibration though.
Andy Ofori - Resolved on Release Reply
I have fitted the xyz probe and tried to test the z probe macro. The duet controller gives an error that command G38.2 does not exist?
Hi Terry, It sounds like you may not have updated the WorkBee Control on your machine.
Are you able to email into Technical Support and we can look at what is causing your issues with the Touch Probe - https://ooznest.co.uk/help/#tab_technica...
hi ryan
could you please let me know where i can find a file too download the workbee control panel
many thanks bryan
bryan robbins - Resolved on Release Reply
Hi Bryan, Thanks for your message, Please see this link on how to update to the latest WorkBee Control - How To Update WorkBee Firmware
Hi I have just built my workbee and at the moment have no idea about all this g-code for the duet or even how to load up the ooznest custom control panel. So far all I have done is manage to home XYZ using the duet web control. Any links for a NOOB
Hi Terry, All the information you require can be found on the Learning Portal if you are stuck on a specific step feel free to get in contact with the team here - https://ooznest.co.uk/help/#tab_technica...
Hello,
Is it possible to run the Workbee control from a tablet or android phone?
one_king@hotmail.co.uk - Resolved on Release Reply
Of course! The WorkBee Control is browser-based so if you have the Wifi Version connect your device to the same network and search for the IP Address that your WorkBee is assigned to.
Hi Ryan,
step 4 - job control has a typo in the sentence below
Use this button to resume a job offer a controlled power off.
should say ‘after’ not ‘offer’
otherwise useful initial guide to the contour panel
serge agius - Resolved on Release Reply
Hi, Keith are you able to contact us here and we can help! - https://ooznest.co.uk/help/#tab_technica...
Hi Ryan…after using the emergency stop the parameter of X has changed and even though it says on the bar 550 it doesn’t travel that far …how do I get my full parameters back ?
Keith Reavill - Resolved on Release Reply
Hi Ryan and happy new year to you…
is there a tutorial on how to us “height map” ?
Keith Reavill - Resolved on Release Reply
Hi Keith,
We don’t have a guide on doing it, however Duet have a guide on using it here: https://duet3d.dozuki.com/Wiki/Using_mes...
Best Regards
Robert
Robert -
Hello Ryan,
What files or information do you need?
thank you so much
Sébastien
Hi, config.g and customconfig.g, if you can email sales@ooznest.co.uk we can sort it out there. Best Regards Ryan Lock
Hello Ryan,
I have an original Workbee 1000 x 1500mm Belt & Screw Drive.
I have just prepared my work surface, which should be 680 x 1150, except after machining, the dimensions are not correct (678 x 1146).
What should I change to get the right dimensions after machining?
Thanks in advance
Cheers
Sébastien
Hi Sebastien,
Thanks for your comment. You need to adjust your steps per mm. Did you want to email into sales@ooznest.co.uk with your system settings and i can make the adjustment for you? We don’t have a guide on it i am afraid.
Best Regards
Ryan Lock
Hi Ryan,
I would like to add a 5” PanelDue to my system.
Are there any plans to update the WorkBee Control to also be available on the PanelDue (for stand alone mode)?
If so any timelines available yet?
Cheers,
Ed
Hi Ed, Thanks for your comment. I am afraid there is no plans to put WorkBee Control on the PanelDue, as the PanelDue, runs a completely different software from the Web Control. An easier way would be to have a Raspberry Pi connected to the machine, and have a small touch screen connected to this pi, running the web control. Ryan
Hi Ryan,
I have figured this out (in case others ask you).
The problem relates to user local screen resolution. I must have pressed something on my keyboard that altered the display resolution.
Subtle, but when I tried CNTRL +/- (in my case -) the screen adjusted and I saw the button return :)
If you wan to simulate open your workbee control. Make sure you can see the “Send Code” field.
Now press CNTRL+ twice (ie 120% of normal resolution). See the “Send Code” field disapear!
Now press CTRL- twice (ie 100% normal resolution) and presto you can see your field again.
Hope it helps.
Cheers,
Ed
Hi Ryan,
Many Thanks. Yes that fixed it :)
I have another one for you if I may?
On the Dashboard I had the field with the SEND button so I can send G & M codes to the workbee.
I don’t know what I did, but this field has suddenly disappeared! I can find it in the ‘Console’ Window but I find it much handier in the Dashboard.
Do you know how I can get it back to the dashboard?
Cheers,
Ed
Hi Ed,
That is strange it has disappeared. I can’t think why it would do that. Can you email a screenshot to sales@ooznest.co.uk?
Best Regards
Ryan Lock
Hi Ryan,
Firstly thanks for your informative docs & youtube videos :)
I am setting up a workbee screwdrive 500x500, Duet2 board (1.02+), Duet2 Wifi (V2.03), Duet Wifi Server (V1.23), Workbee control V1.0.1.
In the ‘congig.g’ file it tells me not to modify it and to rather paste any settings in ‘customconfig.g’.
So my problem is that trying to change the Z axis motor direction by updating (from) M569 P2 S0 > (to) M569 P2 S1 does NOT work.
Firstly I tried customconfig.g, then config.g and finally also added config.g.bak. None of them made any difference,.
Now here is my question:
(1) Is the correct procedure for modification of config.g to ONLY update customconfig.g?
(2) Is there a special “save” routine or SD Card update required for the Duet2 board?
(3) Is there an explanation why changing all the config.g files above with the new S0/1 setting has no affect?
Thanks in advance for any help or further comment.
Cheers,
Ed
Hi,
Thanks for your message. Putting the command in M569 P2 S1 should work. After saving, please press the emergency stop button to restart the controller.
In config.g it should definitely work, i think it is because the controller needs restarting.
Best Regards
Ryan Lock
Hi Ryan,
Many thanks for clearing that up. Do you know if I’m going to get 4 or 5 jogging buttons if I get either a 7 inch or 10 inch android tablet. Cheers
Colin Mill - Resolved on Release Reply
Hi Ryan,
Sorry not to get back to you sooner. Can you please let me know where this button is located as I have been over the interface on both my PC and my phone and especially the settings tabs and cant find it. Cheers.
Colin Mill - Resolved on Release Reply
Sorry i think i was incorrect in my previous message, the version you see if based on screen size and there is no button to switch.
One question I have is about the way the web controller screen setup is controlled. In my PC (with 1920 x 1080 monitor) I get the version with 5 manual move control buttons per axis per direction. On my phone (also with 1920 x 1080 screen) I get the version with only 3 move control buttons per axis per direction. I want to buy a tablet to use with the router but want to be sure that I will get the version of the interface I get on the PC. What do I need to specify as regards the tablet in order for this to happen? Thanks.
Colin Mill - Resolved on Release Reply
Hi Colin, Thanks for your email. On your phone, are you on the Mobile version or Desktop Version. There should be a button to switch between the two?
Note the default IP address appear to be 192.168.251.2
Steve Conway - Resolved on Release Reply
It allows me to also - one month later :)
Artie - Resolved on Release Reply
Hi,
It is a public site, therefore public editing is allowed. For this page, any edits have to be approved by admins.
Best Regards
Robert
Robert -
The link at the top 3. Connecting and Commissioning allows me to edit this page
Courtenay10@hotmail.co.uk - Resolved on Release Reply